| Россия |
Инспектор
Вы можете этот курс.
Опубликован: 06.08.2012 | Уровень: специалист | Доступ: платный
Лекция 5:
Installing FreeBSD
Аннотация: Booting from CD-ROM;
Installing on the Intel i386 architecture Booting to sysinstall Setting installation options;
Partitioning the disk Defining file systems Selecting distributions Selecting the installation medium Performing the installation;
Installing on an Alpha system;
Upgrading an old version of FreeBSD How to uninstall FreeBSD If things go wrong Alternative installation methods.
Ключевые слова: previous, install, this, chapter, finally, if, trouble, back, topic, disk, AS, system, read, installation, architecture, SEE, alpha, processor, software, form, boot, diskette, FROM, CD-ROM, medium, look, floppy disk, VIA, network, First, step, support, DESCRIPTION, real, hardware, running, AND, release, able, setting, BIOS, SCSI, perform, ONE, bios setup, boot sequence, host adapter, boot device, cd-rom drive, NOT, operation, leave, LIKE, bootable, hard, change, documentation, very, Menu, online help, ALL, GET, appropriate, help, part, information, handbook, swap space, custom install, compromise, beginner, terminology, DAO, master boot record, bootstrapping, disk space, allocation strategy, subtype, employ, boot manager, active partition, partition editor, partition table, booting method, root directory, resident, disk drive, system initialization, system crash, data integrity, mailing list, single-user, system file, damage, symbolic link, backup device, physical memory, thumb, assumption, workload, memory performance, hog, graphics programming, reinstall, memory dump, memory system, real memory, memory size, disk label, asterisk, installation medium, unchangeable, moment, system structure, explanation, virtual terminal, SRM, firmware, scratch, mistake, current limit, reset button, ATAPI, hacker, shoulder, wipe, BTX, boot menu, infer, diagnosing, swap file, MFS, installation process, confidence, decrease, attraction, disk image, floppy drive, high-speed
In the previous chapters, we've looked at preparing to install FreeBSD. In this chapter, we'll finally do it. If you run into trouble, I'll refer you back to the page of "Before you install" which discusses this topic. If you want to install FreeBSD on the same disk as Microsoft or another operating system, you should have already read "Shared OS installation" , Shared OS installation.
The following discussion relates primarily to installation on the i386 architecture. See page 78 for differences when installing on the AXP ("Alpha") processor.
Installing on the Intel i386 architecture
To install FreeBSD you need the software in a form that the installation software understands. You may also need a boot diskette. Nowadays you will almost invariably install from CD-ROM, so we'll assume that medium. On page 85, we'll look at some alternatives: installation from floppy disk or via the network.
The first step in installing FreeBSD is to start a minimal version of the operating system. The simplest way is to boot directly from the installation CD-ROM. If your system doesn't support this kind of boot, boot from floppy. See page 85 for more details.
The description in this chapter is based on a real-life installation on a real machine. When you install FreeBSD on your machine, a number of things will be different, depending on the hardware you're running, the way you're installing the software and the release of FreeBSD you're installing. Nevertheless, you should be able to recognize what is going on.
Booting from CD-ROM is mainly a matter of setting up your system BIOS and possibly your SCSI BIOS. Typically, you perform one of the following procedures:
- If you're booting from an IDE CD-ROM, you enter your system BIOS setup routines and set the Boot sequence parameter to select CD-ROM booting ahead of hard disk booting, and possibly also ahead of floppy disk booting. A typical sequence might be CDROM,C,A
- On most machines, if you're booting from a SCSI CD-ROM, you also need a host adapter that supports CD-ROM boot. Set up the system BIOS to boot in the sequence, say, SCSl, A, C. On typical host adapters (such as the Adaptec 2940 series), you set the adapter to enable CD-ROM booting, and set the ID of the boot device to the ID of the CD-ROM drive.
These settings are probably not what you want to use for normal operation. If you leave the settings like this, and there is a bootable CD-ROM in your CD-ROM drive, it always boots from that CD-ROM rather than from the hard disk. After installation, change the parameters back again to boot from hard disk before CD-ROM. See your system documentation for further details.
Booting to sysinstall
The boot process itself is very similar to the normal boot process described on page 528. After it completes, though, you are put into the sysinstall main menu.
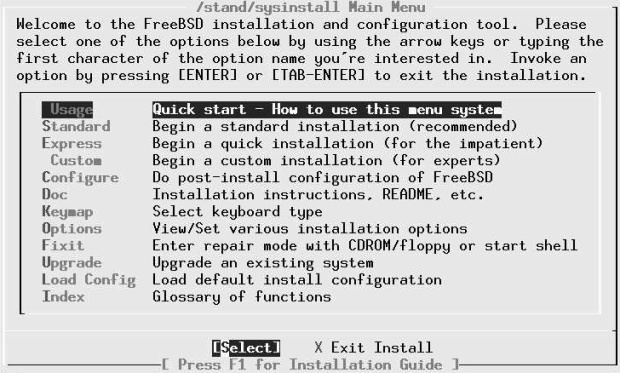
Figure 5-1 shows the main sysinstall menu. sysinstall includes online help at all stages. Simply press F1 and you will get appropriate help. Also, if you haven't been here before, the Doc menu gives you a large part of the appropriate information from the handbook.
Kinds of installation
To get started, select one of Standard, Express or Custom.The names imply that the Standard installation is the best way to go, the Express installation is for people in a hurry, and Custom installation is for when you want to specify exactly what is to be done.
In fact, the names are somewhat misleading. There isn't really that much difference between the three forms of installation. They all perform the same steps:
- Possibly set up options.
- Set up disk partitions, which we'll discuss in the next section.
- Set up file systems and swap space within a FreeBSD slice, which we start on page 67.
- Choose what you want to install, which we discuss on page 75.
- Choose where you want to install it from. We'll look at this on page 76.
- Actually install the software. We'll treat this on page 77.
We looked at disk partitions and file systems on page 34. We'll look at the other points when we get to them. So what's the difference between the kinds of installation?
- The Standard installation takes you through these steps in sequence. Between each step, you get a pop-up window that tells you what is going to happen next.
- The Express installation also takes you through these steps in sequence. The main difference is that you don't get the pop-up window telling you what is going to happen next. This can save a little time. If you do want the information, similar information is available with the F1 key.
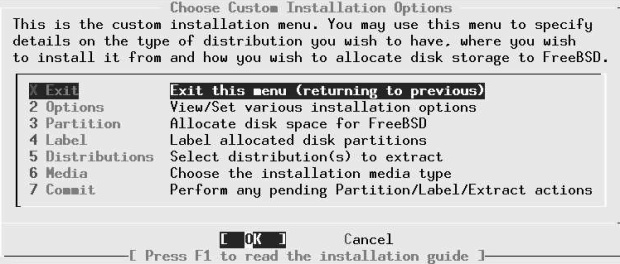
- The Custom installation returns you to its main menu after each step. It's up to you to select the next step. You can also select another step, or go back to a previous one. Like the Express installation, you don't get the pop-up information window, but you can get more information with the F1 key.
The big problem with Standard and Express installations is that they don't let you back up: if you pass a specific step and discover you want to change something, you have to abort the installation and start again. With the Custom installation, you can simply go back and change it. As a result, I recommend the Custom installation. In the following discussion, you won't see too much difference: the menus are the same for all three installation forms.
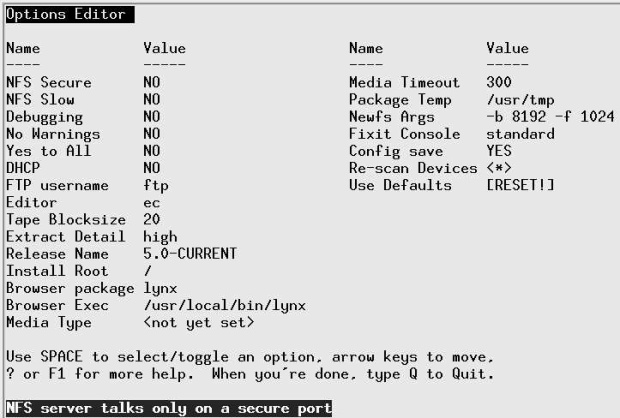
Setting installation options
The first item on the menu is to set installation options. There's probably not too much you'll want to change. About the only thing of interest might be the editor ec, which is a compromise between a simple editor for beginners and more complicated editors like vi. If you're planning to edit anything during the installation, for example the file /etc/exports , which we'll look at on page 566, you may prefer to set an editor with which you are familiar. Select the fields by moving the cursor to the line and pressing the space bar.