
| Узбекистан, Бухара, Бухарский институт высоких технологий, 2013 |
Инспектор
Вы можете этот курс.
Опубликован: 06.08.2012 | Уровень: специалист | Доступ: платный
Лекция 5:
Installing FreeBSD
Setting up the ftp server
Put the FreeBSD distribution in the public ftp directory of the ftp server. On BSD systems, this will be the home directory of user ftp, which in FreeBSD defaults to /var/spool/ftp The name of the directory is the name of the release, which in this example we'll assume to be 5.0-RELEASE. You can put this directory in a subdirectory of /var/spool/ftp, for example /var/spool/ftp/FreeBSD/5.0-RELEASE, but the only optional part in this example is the parent directory FreeBSD.
This directory has a slightly different structure from the CD-ROM distribution. To set it up, assuming you have your distribution CD-ROM mounted on /cdrom, and that you are installing in the directory /var/spool/ftp/FreeBSD/5.0-RELEASE, perform the following steps:
# cd /var/spool/ftp/FreeBSD/5.0-RELEASE
# mkdir floppies
# cd floppies
# cp /cdrom/floppies/* .    don't omit the . at the end
# cd /cdrom                 the distribution directory on CD-ROM
# tar cf - . | (cd /var/spool/ftp/FreeBSD/5.0-EELEASE; tar xvf -)
This copies all the directories of /cdrom into /var/spool/ftp/FreeBSD/5.0-RELEASE. For a minimal installation, you need only the directory base. To just install base rather than all of the distribution, change the last line of the example above to:
# mkdir base
# cp /cdrom/base/* base
Installing via ftp
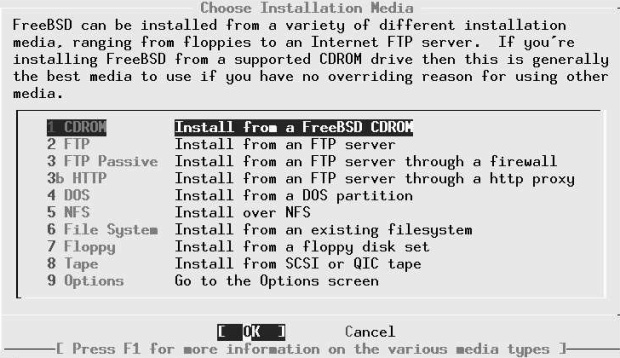
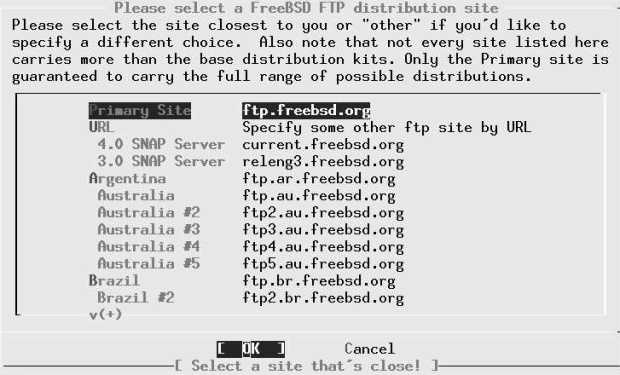
On page 77 we saw the media select menu. Figure 5-16 shows the menu you get when you select FTP or FTP Passive.To see the remainder of the sites, use the PageDown key. Let's assume you want to install from presto, a system on the local network. presto isn't on this list, of course, so you select URL. Another menu appears, asking for an ftp pathname in the URL form ftp://hostname/pathname. hostname is the name of the system, in this case presto.example.org, and pathname is the path relative to the anonymous ftp directory, which on FreeBSD systems is usually /var/spool/ftp.The install program knows its version number, and it attaches it to the name you supply.
You can change the version number from the options menu, for example to install a snapshot of a newer release of FreeBSD.
In this case, we're installing Release 5.0 of FreeBSD, and it's in the directory /var/spool/ftp/pub/FreeBSD/5.0-RELEASE. sysinstall knows the 5.0-RELEASE, so you enter only ftp://presto.example.org/pub/FreeBSD. The next menu asks you to configure your network. This is the same menu that you would normally fill out at the end of the installation—see page 98 for details.
This information is used to set up the machine after installation, so it pays to fill out this information correctly. After entering this information, continue with Commit (on page 77).
Installing via NFS
If you're installing from a CD-ROM drive on another system in the local network, you might find an installation via ftp too complicated for your liking. Installation is a lot easier if the other system supports NFS. Before you start, make sure you have the CD-ROM mounted on the remote machine, and that the remote machine is exporting the file system (in System V terminology, exporting is called sharing). When prompted for the name of the directory, specify the name of the directory on which the CD-ROM is mounted. For example, if the CD-ROM is mounted on directory /cdrom on the system presto.example.org, enter presto.example.org:/cdrom. That's all there is to it!
Older versions of FreeBSD stored the distribution on a subdirectory dists. Newer versions store it in the root directory of the CD-ROM.
Next, you give this information to sysinstall, as shown in Figure 5-17 . After entering this information, sysinstall asks you to configure an interface. This is the same procedure that you would otherwise do after installation—see page 98. After performing this configuration, you continue with Commit (on page 77).
Installing from a Microsoft partition
On the Intel architecture you can also install from a primary Microsoft partition on the first disk. To prepare for installation from a Microsoft partition, copy the files from the distribution into a directory called C:\FREEBSD. For example, to do a minimal installation of FreeBSD from Microsoft using files copied from a CD-ROM, copy the directories floppies and base to the Microsoft directories C:\FREEBSD\FLOPPIES and C:\FREEBSD\BIN respectively. You need the directory FLOPPIES because that's where sysinstall looks for the boot.flp, the first image in every installation.
The only required directory is base. You can include as many other directories as you want, but be sure to maintain the directory structure. In other words, if you also wanted to install XF86336 and manpages, you would copy them to C:\FREEBSD\XF86336 and C:\FREEBSD\MANPAGES.
Creating floppies for a floppy installation
Installation from floppy disk is definitely the worst choice you have. You will need nearly 50 floppies for the minimum installation, and about 250 for the complete installation. The chance of one of them being bad is high. Most problems on a floppy install can be traced to bad media, or differences in alignment between the media and the drive in which they are used, so:
Before starting, format all floppies in the drive you intend to use, even if they are preformatted.
The first two floppies you'll need are the Kernel floppy and the MFS Root floppy, which were described earlier.
In addition, you need at minimum as many floppies as it takes to hold all files in the base directory, which contains the binary distribution. Read the file LAYOUT.TXT paying special attention to the "Distribution format" section, which describes which files you need.
If you're creating the floppies on a FreeBSD machine, you can put ufs file systems on the floppies instead:
# fdformat -f 1440 fd0.1440
# bsdlabel -w fd0.1440 floppy3
# newfs -t 2 -u 18 -l 1 -i 65536 /dev/fd0
Next, copy the files to the floppies. The distribution files are split into chunks that will fit exactly on a conventional 1.44MB floppy. Copy one file to each floppy. Make very sure to put the file base.inf on the first floppy; it is needed to find out how many floppies to read.
The installation itself is straightforward enough: follow the instructions starting on page 63, select Floppy in the installation medium menu on page 76, then follow the prompts.